- Reduce Bounce Rate
- Control Desk
Banner management in the Control Desk for campaign promotion
Banner management makes it possible to integrate graphics and content into the results page of specific product listings or search queries in the online shop. Once activated, these can appear in various positions, e.g., on the respective search results page, the results page of the corresponding product listing, or in the typeahead. But that's not all—there are various ways to attract the attention of online shoppers and use banners in different ways for marketing campaigns. You can find out more about the use of digital banners and how they work in the Control Desk in this blog article.
This content awaits you in this blog article:
Highlight marketing campaigns via banners
How to manage banners in the Control Desk
Select trigger
Configure banner settings
Use cases Banner management
#1: Display banners above the search results and in the typeahead (header + typeahead)
#2: Display banners in search results as a line between product tiles (inline)
#3: Display banners in the product listing as tile banners (tile)
Conclusion: Take advantage of the many possibilities offered by banner management.
Highlight marketing campaigns via banners
Banners are a popular way to promote campaigns in e-commerce. If you also incorporate them into searches or product listings, they become a searchandising campaign and ecommerce search engine becomes a sales promotion tool. With banner management in the Control Desk, you can embed your own graphics in the form of banners on the results page of specific search queries or product listings. In addition to simple image banners, you can also create HTML banners with customized content. This means that online shoppers will see a banner on the results page that matches their search term. This banner can redirect them to a specific landing page to highlight a corresponding marketing campaign. This makes cross-sellingand upselling easy, as the search results page or product listing does not lose relevance due to integrated banners.
Stay up to date on personalization: Sign up for the Epoq newsletter: Register now!
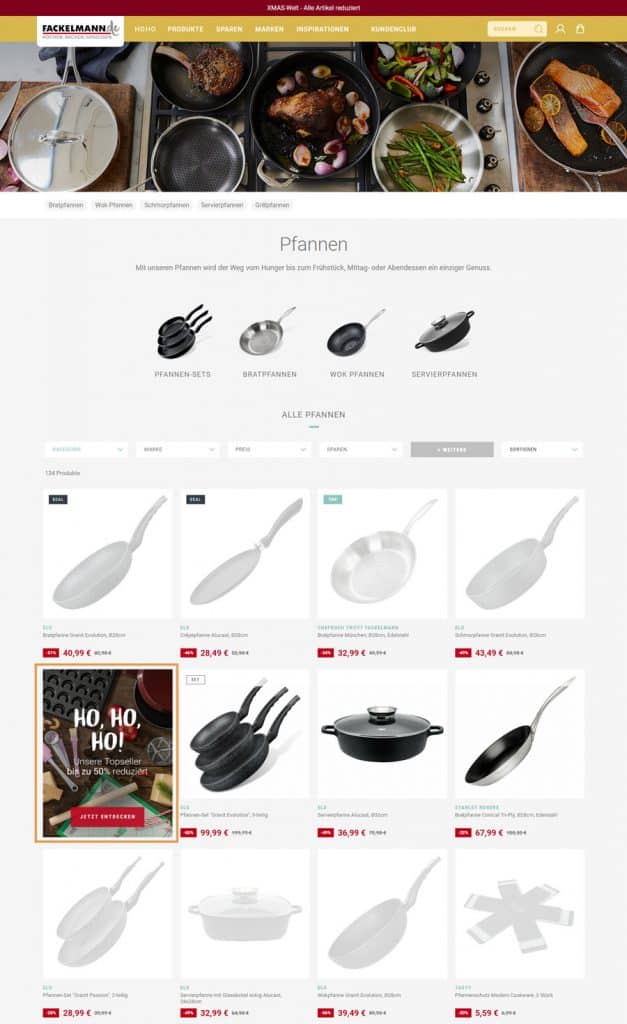
Fackelmann, for example, uses tile banners in product listings on category pages to draw attention to current promotions.
(Source: Screenshot from fackelmann.de)
How to manage banners in the Control Desk
You can find banner management in the Control Desk in the Search section. To create a new entry, simply click on "Create entry. " You must then carry out the following steps:
Select trigger
First, you need to specify when the banner should be displayed. You can choose from various triggers for the banner display: search term, all search results pages, product listing, all product listings, and all search results pages and product listings.
If you choose "Search term" as the trigger, you can then enter the search terms for which the banner should appear. These can be expanded with various options. The following options are available to you:
- Similar: Similar search terms are included. This means that for three to five letters, one typo is allowed; for six or more letters, the tolerance is two typos.
Example: Search for "baggy," but the banner search term is "buggy." - Includes: The banner is also displayed for searches that include the banner search term.
Example: Search for Asus 15-inch laptop, but the banner search term is laptop. - Starts with: For searches that start with the banner search term, the banner will also appear.
Example: Search for winter jacket, but the banner search term is winter. - Ends with: For searches that end with the banner search term, the banner will also be displayed.
Example: Search for olive oil, but the banner search term is oil.
If no other search option is selected, the "exact" option applies . In this case, the entry only applies if the search term is searched for on its own and consists exclusively of exactly these letters.
You also have the option of using filters to refine the selected trigger, for example, by specifying that the banner should only be displayed if the search term is shirts from brand A or B. The search result of the entered search term determines which filter values can be selected.
If desired, you can then create a time limit for the banner (in line with the marketing campaign). To do this, simply select a start and end date for your entry. You can also specify neither or just one of the two. You can also select for which country code of the online shop where the entry is to be displayed.
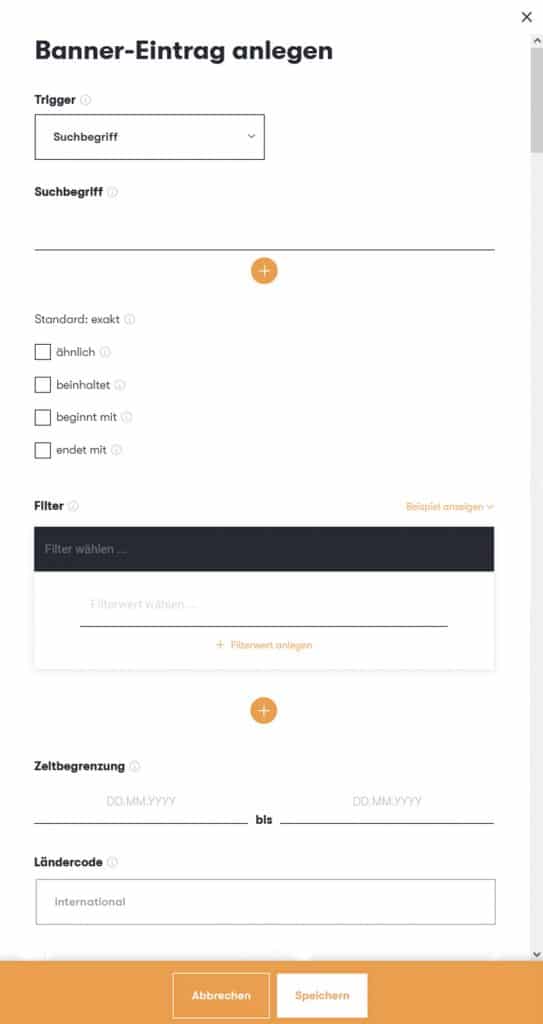
The Control Desk offers various settings options for creating a banner entry.
Configure banner settings
Under Banner Settings, you must now decide on a banner layout. You can choose from the following options:
- Image banner
- HTML banner
- Image + search for zero hits (this option is hidden if you are already using zero hit management in the Control Desk)
Normal image banners can be integrated in JPG or PNG format. Optionally, you can enter a target URL to which the banner should link.
HTML banners are HTML codes that are displayed as banners and offer a high degree of flexibility in terms of design. When it comes to banner formats, you can use the banners in your online shop as a guide. There are no specific requirements.
In the next step, you can choose the position of your banner. This means you can decide exactly where the banner should appear. The following options are available:
- Header (banner above the product tiles)
- Inline (banner as a line between product tiles)
- Tile (banner as a tile between product tiles)
You can also display the banner additionally or only in typeahead.
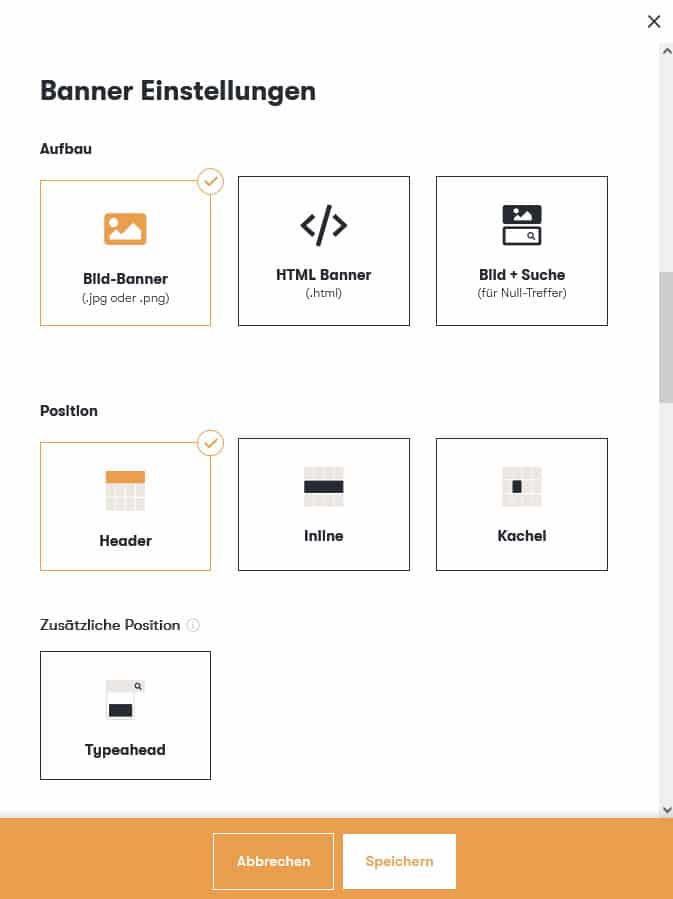
Under Banner Settings in the Control Desk, you can specify the layout and position of your banner.
For image banners, the next step is to enter the image URL, optionally a target URL to which the banner should link, and a title for the HTML attribute "title."
For the HTML banner, you just need to insert the HTML code.
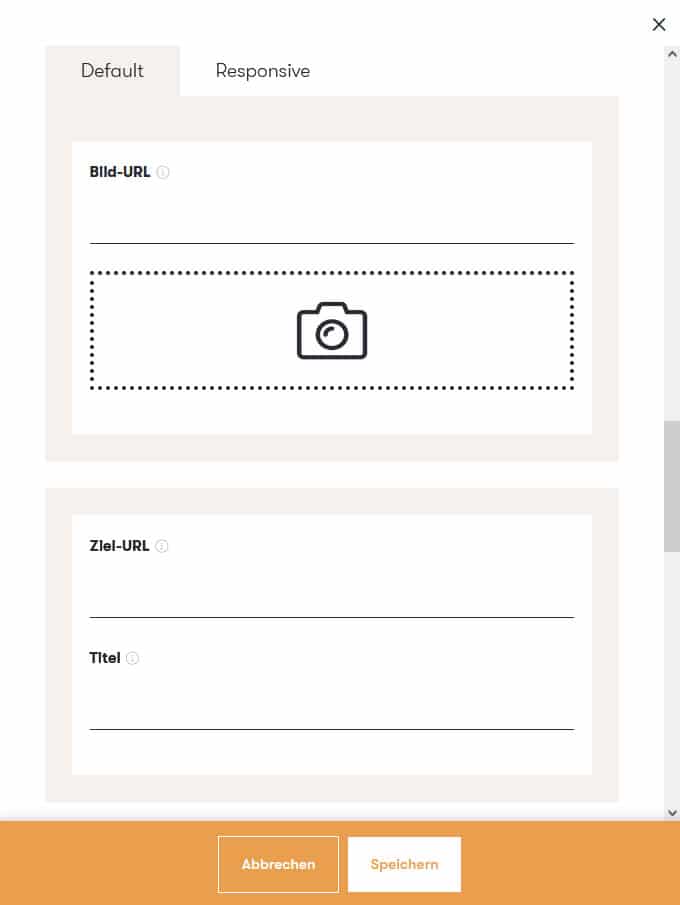
The image URL, target URL, and title can be specified for the image banner in the Control Desk.
Im Tabreiter „Responsive“ kannst du zudem unterschiedliche Bild-URLs für Tablet (<= 768px) und Mobile (<= 480px) hinterlegen, z. B. für unterschiedliche Bildformate. Alternativ kannst du srcset und sizes verwenden. Für diese Anwendung sind HTML- und CSS Vorkenntnisse von Vorteil. srcset listet ein Set von Bildern für alternative Bildgrößen auf, unter denen der Browser ein Bild aussuchen kann. sizes setzt die Bedingungen, zu denen der Browser das Bild aussucht, z. B. nach Größe des Browserfensters.
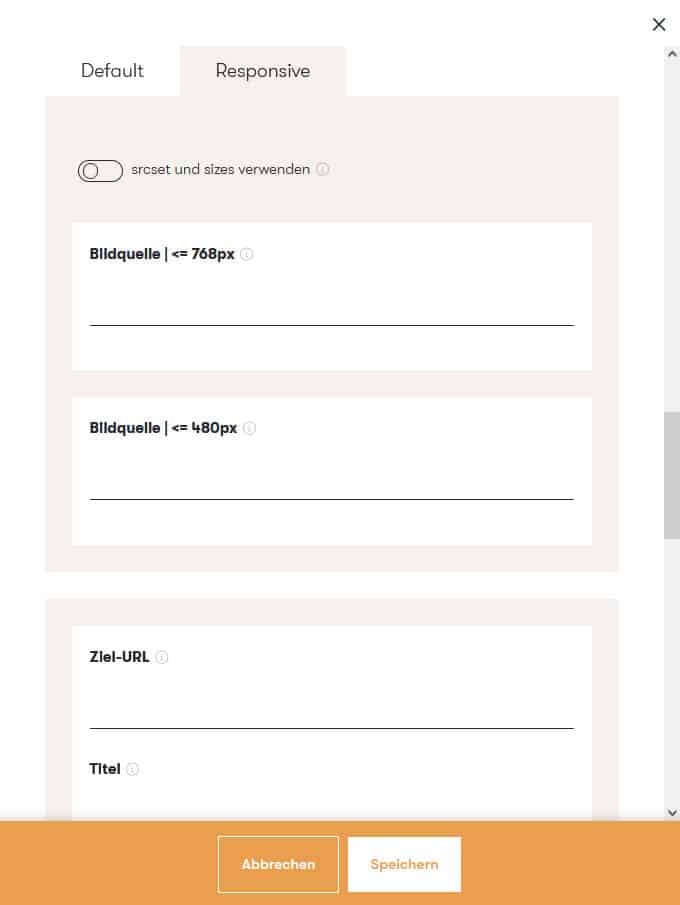
In the "Responsive" tab, different image URLs for tablets and mobile devices can be stored in the Control Desk.
When you save, the newly created banner will appear in the overview and, if the promotion period has already begun, in the online store as well.
Note: Before you can use the new options for banner layout, position, and responsiveness, they must first be configured by our Epoq admins.
Are you interested in the new features? Then feel free to ask your personal Customer Service Manager and have yourself added to the implementation list.
Use cases Banner management
To illustrate the possible uses of banner management and the appropriate settings, we have compiled three use cases for you:
#1: Display banner above search results and in typeahead (header + typeahead)
Black Friday is just around the corner and you want to promote your sale offers, e.g., in the header on all search results pages and product listings, as well as in your search typeahead. To do this, use the trigger "All search results pages and product listings" and select both "Header" and "Typeahead" as the position. Then enter the image URL for your banner and add the URL of your Black Friday landing page with all the sale items your banner should link to as the target URL.
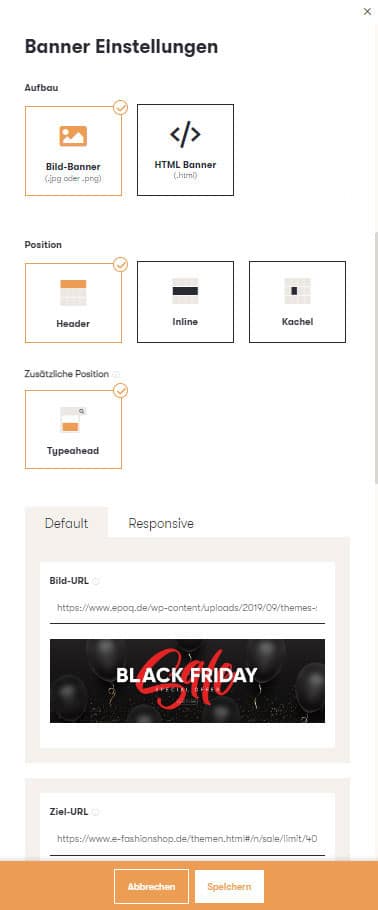
Banners can be displayed using the Control Desk above the search results and in the typeahead, among other places.
This is how it could look in your online shop:
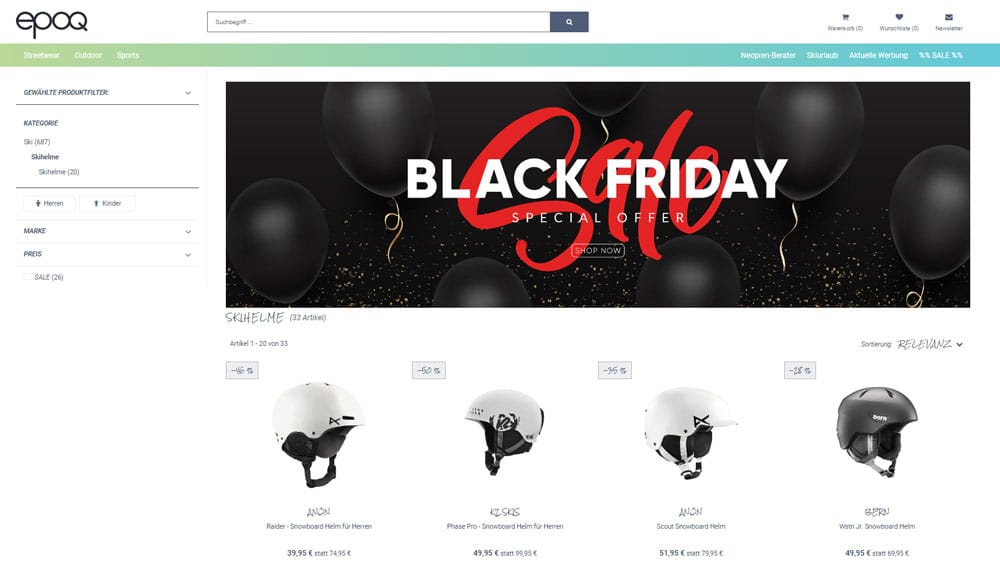
The use of banners is suitable, for example, for promoting specific offers, such as for Black Friday.
#2: Display banners in search results as a line between product tiles (inline)
You have a specific sale promotion running in your online shop, such as "20% off handbags." You want to draw attention to this promotion with an inline banner on the search results page for "handbags." To do this, create a new banner entry, select "Search term" as the trigger, and enter the term "handbag." Set the banner position to "Inline" and set the line number to three, for example. This will display the banner in the third line of the search results.
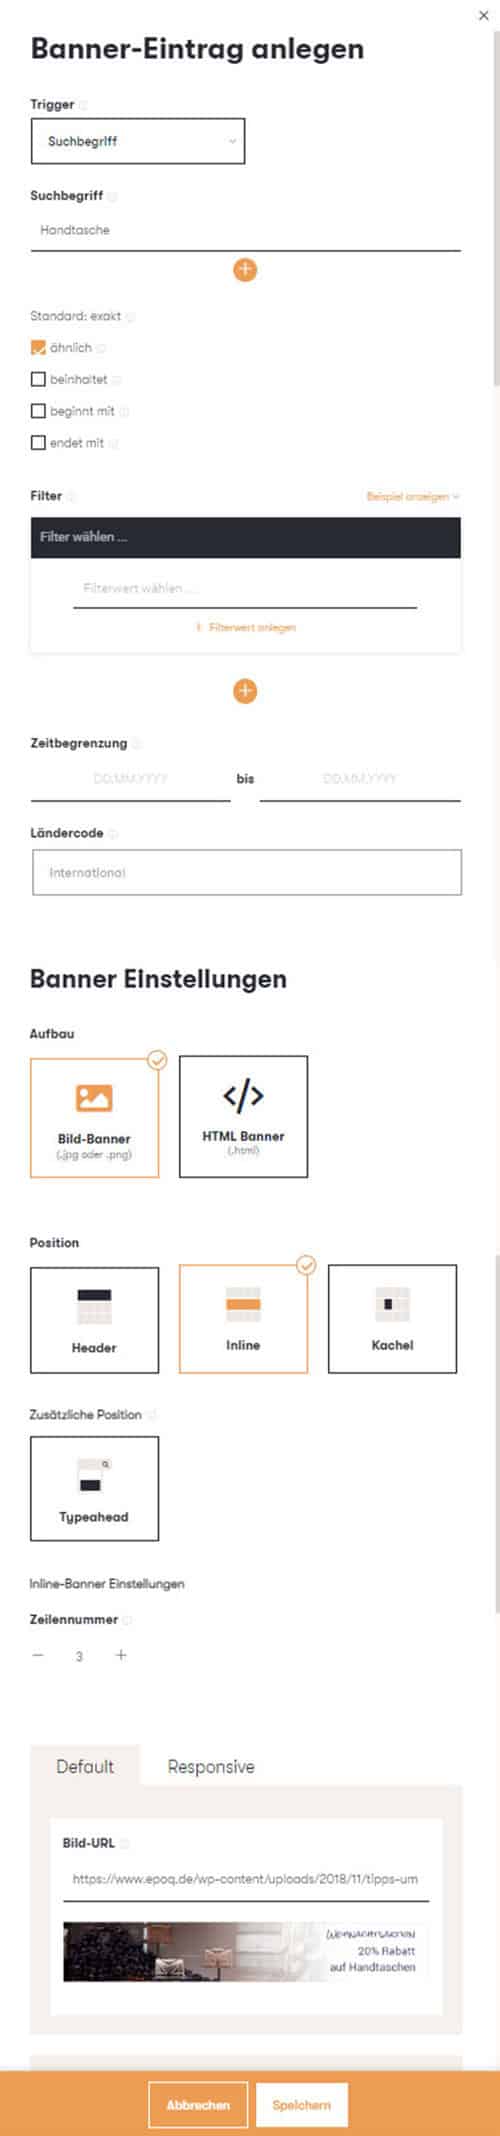
The position can be precisely defined in the Control Desk to specify where the inline banner should be displayed.
#3: Display banners in product listings as tile banners (tile)
You want to use a banner to redirect users to a specific landing page. For example, if you have new hoodies in your online shop, you can integrate a banner on the jeans category page that draws attention to matching tops. To do this, you can use "Product Listing" as the trigger and select the "Jeans" category and "Tile" as the position. To specify exactly where the banner appears in the product listing, you can set the tile number to four, for example. You can also specify the desired banner width, e.g., one. Your banner will then be displayed as the fourth tile within the product listing.
The tile banner is also particularly well suited for teasing your newsletter. Instead of linking to a category page, you can simply redirect users to the newsletter sign-up page and thus gain new subscribers.
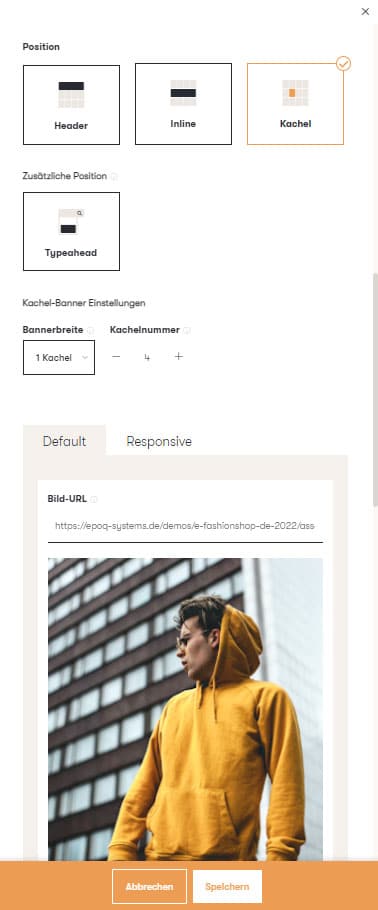
You can use the Control Desk to display tile banners on specific category pages, for example, to redirect shop customers from there to special landing pages.
Stay up to date on personalization: Sign up for the Epoq newsletter: Register now!
Conclusion: Take advantage of the many possibilities offered by banner management.
The banner management feature in Control Desk offers you numerous options for promoting campaigns. Banners visually remind users of current marketing campaigns. Simply create banners in Control Desk with just a few clicks, link them to search terms, and promote your marketing campaign with every search for these terms. This will make your merchandising campaigns even more successful.
Increase your personalization success
Do you have any questions or need help with optimization? Our Customer Success Team will be happy to assist you.

Log in to your Control Desk now and start optimizing.

Janina Küpferle
You are currently viewing placeholder content from HubSpot Embedded Content. To access the actual content, click the button below. Please note that doing so will result in data being shared with third-party providers.
More InformationYou are currently viewing placeholder content from HubSpot. To access the actual content, click the button below. Please note that doing so will result in data being shared with third-party providers.
More InformationYou are currently viewing placeholder content from HubSpot Meetings. To access the actual content, click the button below. Please note that doing so will result in data being shared with third-party providers.
More Information